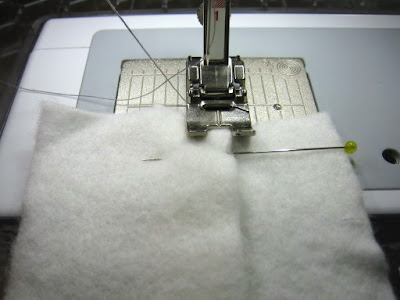
 So I was ready to make a quilt sandwich for the Underground Railroad doll quilt when I discovered all the batting I have is either way too big to waste cutting up or just a wee bit too small. Rather than buying a crib sized quilt bat, I attached strips of batting that I'd trimmed from previous quilts to the four sides of a slightly too small piece of batting. More specifically I used a flat joining seam to sew together a Frankenbatting. MWAH HAH HAH HAAAaaaa!
How to Make a Frankenbatting
Bernina owners, turn to pages 38-39 of Mastering Your Bernina Sewing Machine (here's a link to a PDF version of the whole honkin' thing if you've lost your copy). On a Bernina 440, use stretch overlock stitch (No. 23) and presser foot No. 1.
Stretch Overlock Stitch No.
bernette 55: 10
bernette 65: 13
bernette 80e: S5
bernette 90e: S5
Bernina 1008: 11
Bernina 220: 15
Bernina 230PE: 17
Bernina 240: 19
Bernina 440QE: 23
Bernina 630: 13
Bernina 640: 13
Bernina 730: 13
If you are not blessed with a Bernina, you could use a stretch overlock stitch (if the needle were square dancing, it would take two steps forward, two steps to the right, two steps to the left, and repeat-- Do Si Do your pardner!--sorry, spring was square dancing time in my elementary school gym class). If you have a bare bones machine, a wide zig-zag will probably work just fine.
 I pinned the layers of batting together just so they wouldn't get away from me. I overlapped them about 5/8 inch, but I just eyeballed it.
 Be sure to keep the edge of the overlapped batting right along the inside edge of the presser foot so the stitch will sew just over the edge of the top layer on the right swing of the needle.
 I didn't pin for the second row of stitching as the first row and its fuzziness kept it where it needed to be. Also, I used the mirror stitch function so I could keep the narrow side of the batting running under the arm, but if you don't have the mirror stitch function, just roll up the extra batting to move it through the arm.
 The finished flat joining seam!
 If you're concerned that the stitches will show through a light top or backing, you certainly could use a lighter thread color. I just happened to have gray thread in the machine. But I ran out of bobbin thread and switched to bright yellow. You can see in the picture above how a different color thread blends in much better with the batting.
 No Igors were harmed in the making of this Frankenbatting.
2 comments:
Um, I am highly impressed. And I think I have a strange desire for a Bernina.
TEMPTRESS!!!
This post shouldn't make you covet a Bernina. Honestly, I'm pretty sure extremely basic machines could do the stitch I used for the Frankenbatting.
Wait until I demo the REALLY fancy stitches . . . and the stitch regulator. The latter is what sealed the deal for me.
Post a Comment